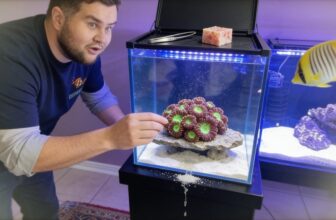
You’ll keep a Duncan coral alive easily if you can keep a goldfish alive for a month.
This forgiving large stony polyp (LSP) builds its own calcium skeleton and rarely punishes mistakes.
Keep temps 72–78 °F, flow under 4× tank volume per hour, and place it in moderate light.
Feed thawed mysis 2–3 times weekly, target each polyp’s mouth.
Use reef-safe putty to secure the base.
At A Glance
- Place on bottom or mid-tank with moderate-to-high light and low-to-moderate flow.
- Keep water temperature 72–78°F, pH 8.1–8.4, dKH 8–12, and salinity 1.023–1.025.
- Feed 2–3 times weekly at night with thawed Mysis or brine shrimp using a turkey baster.
- Use a minimum 30-gallon tank with stable rockwork and reef-safe epoxy to secure the base.
- Handle only the calcified skeleton; avoid touching polyps and quarantine new arrivals with an iodine dip.
Why Duncan Coral Is a Great Choice for Beginners
If you’re new to reef keeping, Duncan coral is the smartest first step you can take. It’s peaceful, doesn’t sting, and won’t bully your other tank mates—nice, right? You’ll love how it waves its green and purple tentacles day and night, retracting only when bothered. Seriously, it’s forgiving. You don’t need a PhD in water chemistry; just stable temps (72–78°F) and moderate light. Equipment’s cheap, too—a basic heater and pump work fine. Ensure filter flow reaches 4–5× tank volume per hour to keep water quality stable for your Duncan. Plus, it’s a Large Stony Polyp (LSP), meaning it builds a calcium skeleton, but it won’t stress you out. Bottom line? It’s the coral that lets you fit in without the meltdowns.
Duncan Coral Size and Lifespan Explained
You now know why Duncan coral is a beginner’s best friend—it’s cheap, easy, and won’t start a turf war.
Duncan coral is a beginner’s best friend—cheap, easy, and won’t start a turf war.
So, what about size and lifespan? Well, each polyp stays modest, but a colony can spread like a party you didn’t invite.
In the wild, these guys can live over 100 years—yes, centuries.
In your tank? Don’t hold your breath; captivity shortens that drastically, though exact numbers are fuzzy.
Damage invites infection, so handle ’em gently.
They’re not immortal, just resilient.
You’ll get solid growth if you provide space and stable water.
Bottom line: enjoy the long haul, but protect them.
For safe operation, consider using heaters with dual-outlet controllers to back up your system.
Choose Tank Size and Placement
A 30‑gallon tank is the absolute minimum for Duncan coral—any smaller and you’re basically forcing a colony into a closet.
Place it on the bottom or middle of your tank, where moderate to high lighting hits.
Low to moderate flow works best; too strong and those tentacles won’t wave right.
You’ll need a heater to keep temps 72‑78 °F, plus a chiller or fan for hot days.
Budget about $150–$300 for a decent setup.
Bottom line? Give these guys room and stable water, and they’ll reward you—a colony for the club you’re building.
Choose a low‑iron glass tank for the clearest view of your Duncan coral’s details.
Best Substrate and Attachment Points
Since Duncan corals are heavy sleepers—they don’t budge—but they’re similarly clumsy, a stable substrate and solid grip are non-negotiable. You’re building a home for a colony that’ll live decades, so don’t cheap out.
A stable substrate and solid grip are non-negotiable for a colony that’ll live decades.
- Dry rock base: Costs $3–$5 per pound. Stack it securely, never wobbling, and your Duncan’s skeleton fuses tight—no tipping, no stress.
- Reef-safe epoxy putty: $10 a stick. Glue the coral’s base directly to rock; it cures underwater in minutes. Perfect for that “oops, I bumped it” moment. Some varieties, like the Oceans Wonders Coralline Purple putty, set in just 5 minutes and fully cure in 45 minutes.
- Coarse aragonite sand: $20 per 20-lb bag. Avoid fine stuff—it shifts too easily. Your Duncan needs a foundation that stays put, not a shifting sand trap.
Bottom line: pick rough, heavy substrate and lock everything down. You’re part of the colony now—own it.
5 Must-Have Equipment Items for a Duncan Coral Tank
- Heater, 100–150W: Duncan’s need 72‑78°F stable. A quality titanium heater ($40) beats a glass one that cracks.
- Powerhead, low‑to‑moderate flow: Gentle wave, not a hurricane. A 400‑GPH pump ($30) works for a 30‑gallon tank.
- LED or T5 lighting: Moderate to high PAR—think Radion or a cheap fixture ($100+). Your coral photosynthesizes; dim lights kill color. A reliable option like the VIPARSPECTRA 165 W provides even light spread with natural dawn-to-dusk dimming for healthy coral growth.
- Sump or canister filter: Sump ($150) handles volume; canister ($60) simplifies. Both keep water clean.
- Chiller or fan: Tank hits 80°F? A clip‑on fan ($15) saves your coral.
Bottom line: Spend $200 wisely, and you’ll belong with the reef‑keeping crowd.
Duncan Coral Water Parameters You Must Maintain
You’ve got the gear, but without the right numbers, that gear is just expensive decoration. Your Duncan needs precise water chemistry to thrive. Nail these three parameters:
- Temperature: Keep it between 72‑78°F. Anything outside that range stresses your coral, slowing growth and risking infection. A stable heater is non‑negotiable.
- pH & Alkalinity: Aim for pH 8.1‑8.4 and dKH 8‑12. Low alkalinity wrecks skeleton formation; high pH burns tentacles. Test weekly, adjust slowly.
- Salinity: Specific gravity must stay 1.023‑1.025—too low, your coral deflates; too high, it shrivels. Use a reliable refractometer, not a cheap hydrometer. For precise temperature tracking in your tank, a digital hygrometer can help maintain stable conditions.
Stay inside these ranges, and you’re part of the reefing tribe that actually keeps Duncan alive.
Duncan Coral Lighting and Flow Requirements
Why does Duncan coral need just the right lighting and flow?
Since it’s a picky little diva from deep Australian waters. Too much light, and it bleaches; too little, and it starves.
Since it’s a picky little diva from deep Australian waters—too much light bleaches it, too little starves it.
You want moderate-to-high lighting—say, 50-100 PAR—with LED or T5 fixtures.
For flow, keep it low-to-moderate. A gentle pulse, not a jet blast.
Your Duncan’s tentacles should sway, not snap.
Stable placement on sturdy rockwork prevents falls.
To support optimal color, ensure your light provides blue LEDs at 445-470 nm for photosynthesis.
Get this wrong, and your colony sulks.
Get it right, and you’re part of the club that grows vivid, happy corals.
How to Feed Your Duncan Coral for Vibrant Growth
Since your Duncan coral gets most of its energy from photosynthesis, feeding it’s like giving dessert to someone who already ate dinner—nice, but not essential.
But if you want energetic growth, you’ll feed it anyway.
Here’s your game plan:
- Target each polyp’s mouth directly using a turkey baster or pipette. Wait for tentacles to grab the food, then lower it in. Miss the mouth, and you’re just feeding your tank’s clean-up crew.
- Feed at night or during low flow when tentacles are fully extended. They’re lazier in bright light or strong current, meaning you’ll waste food and get frustrated.
- Stick to 2–3 feedings per week—any more risks polluting your tank water. Duncan corals grow steadily with this rhythm, and you’ll see richer colors within a month. Consider using a magnetic aquarium cleaner to keep glass clear during feeding sessions.
Bottom line: feed smart, not often. Your colony will thank you.
Best Foods to Offer: Mysis, Brine Shrimp, and More
Your Duncan coral’s mouth is basically a tiny, impatient stomach—it’ll grab whatever you drop near it, but not all food is worth the trouble. You’re part of the crew that feeds smart, not just often. For best visual contrast, pair feeding time with a dark substrate like Aqua Natural Midnight Pearl to help your coral’s colors pop during feeding.
| Food Type | Feeding Tips | Why It Works |
|---|---|---|
| Mysis shrimp | Thaw first, offer 2–3 pieces per head | High protein, easy to digest |
| Brine shrimp | Rinse to remove excess salt | Good for variety, not daily |
| Cyclops | Tiny, perfect for small mouths | Boosts color, packed with nutrients |
| Copepods | Let them swim wild, natural hunt | Keeps coral active, mimics reef life |
Stick with frozen over dry—your colony will thank you with brighter tentacles and faster growth.
Preventing Damage and Infection in Your Duncan Coral
Damage is your Duncan coral’s worst enemy—think of it like a papercut that turns into a shark bite. You’re part of a community that knows prevention beats panic, so follow these three rules to keep your colony safe.
- Handle with surgical care – Never touch the fleshy polyps. Use clean tools (any cheap $10 forceps work) and grip only the calcified skeleton, not the soft tissue.
- Quarantine new arrivals – Dunk every store‑bought frag in an iodine dip for 5 minutes. It’s like giving your coral a tiny bath—silly but effective—and stops hitchhiking parasites cold.
- Secure the base – Glue your coral’s skeleton to a stable rock with reef‑safe putty ($8 at any LFS). A wobbling colony invites tearing, which invites infection.
For added protection, consider a cover with high light transmission to maintain coral health while preventing jumpers or debris from damaging your setup.
When Your Duncan Coral Falls: Quick Recovery Steps
Even when you follow every rule, gravity still wins sometimes. Don’t panic—we’ve all been there.
First, gently scoop your Duncan coral with a soft net or gloved hand—avoid touching its fleshy polyp, the individual tentacled mouth.
Inspect the calcified skeleton, its hard base, for cracks.
If it’s broken, use superglue gel to reattach it to a stable rock, pressing firmly for 30 seconds.
Place it back in low flow, moderate light for a week.
Reduce feeding to once weekly.
Watch for white tissue recession; that’s infection.
Act fast, and your colony recovers together. Many glues are also ISO 11600‑F/G compliant for safe underwater curing.
Breeding Duncan Coral in Your Home Aquarium
Once you’ve got your Duncan coral settled and happy, breeding it in a home aquarium is surprisingly straightforward. Your colony just needs the right push to start splitting heads.
Breeding Duncan coral is surprisingly straightforward once your colony is settled and happy.
- Feed heavily for two weeks – Boost feeding to three times weekly with mysis or cyclops; your coral will interpret this bounty as a signal to expand territory.
- Perform a small, cool water change – Drop temperature 2–3°F for one day, simulating a natural seasonal shift that triggers reproduction.
- Increase lighting intensity slightly – Raise PAR by 10–20% for four hours daily, encouraging new head formation without shocking established polyps.
Stable water quality from proper filtration supports coral growth and helps prevent stress during breeding attempts.
Bottom line: keep parameters stable, feed well, and watch your colony double in months. You’re part of the propagation crew now.
Common Beginner Mistakes to Avoid
What’s the fastest way to turn a thriving Duncan coral into a sad, slimy mess? Plopping it in unstable rockwork. That fall damages its skeleton, inviting infection.
Don’t rush placement. Secure it firmly on a flat surface, and crank your lights too high? You’ll bleach it. Stick to moderate intensity.
Overfeeding? That spikes nutrients, choking your coral. Feed tiny portions once a week.
And ignore calcium levels? Your Duncan won’t grow its stony skeleton. Test weekly, target 400-450 ppm.
Avoid these errors, and you’re part of the crew keeping Duncan corals alive. You’ve got this. Use a seawater salinity refractometer to check your water parameters accurately, as improper salinity stresses corals just as much as unstable rockwork.
Where to Buy Duncan Coral and How to Spot a Healthy Specimen
Okay, where can you actually find a healthy Duncan coral without getting scammed?
Your best bet is a dedicated local fish store (LFS) or a reputable online vendor like LiveAquaria or SaltwaterAquarium.com.
Don’t impulse-buy that cheap, sad coral from a random Facebook ad—you’ll just pay for funeral shipping next week.
Spotting a healthy specimen boils down to three quick checks:
- Tentacles fully extended during the day, not shriveled or slimy, with bright, defined colors.
- No tissue recession or exposed white skeleton near the base—that’s a death sentence waiting to happen.
- No visible pests like flatworms or nudibranchs on the coral or plug.
Bottom line: inspect like a paranoid parent, or you’ll end up with an infected pet rock.
If you need to isolate a new specimen, a magnetic acclimation isolation box provides gentle water flow through 2.5 mm slits.
Frequently Asked Questions
Can I Keep Duncan Coral With Other Aggressive Corals?
You can keep Duncan coral with aggressive corals, but it’s risky.
Peaceful Duncans don’t sting, but aggressive ones—like acans or euphyllia—will.
Keep a 4‑6 inch gap to avoid sweepers; Duncans are fragile, and damage leads to infection fast.
For a thriving community, pair them with similar calm species or risk losing your Duncan for good.
How Do I Slow Down Water Flow for Duncan Coral?
You can’t just “slow down” the flow for your Duncan without causing dead spots, which invite algae.
Instead, position it in a low-to-moderate flow zone—place it on the tank’s bottom or sides, using rockwork to break the current.
A simple powerhead aimed at a glass panel or rock does the trick.
No need for expensive gear.
It’s like angling your face into the wind—more comfortable, same air.
Bottom line: redirect, don’t reduce.
What Causes Duncan Coral to Close up for Days?
Your Duncan coral closed for days? It’s likely stressed—a real drama queen.
Common causes: sudden water parameter swings (temp, pH, or salinity), intense light, or flow knocking it around.
Damage from falling or scraping? That’s an infection risk.
I’ve seen mine sulk after a rough cleaning.
Check your parameters and flow, give it stable conditions.
Bottom line: fix the stressor, and it’ll reopen.
Will Duncan Coral Grow Faster With More Feeding?
Short answer: yes, but don’t go overboard. Feeding your Duncan coral a few times a week—target mysis or brine shrimp—directly boosts growth, especially if you’re after that lush, colony sprawl.
- Speeds up polyp division,
- improves color,
- but excess food fouls water, hurting growth.
Stick to 2‑3 light feedings weekly, combined with stable calcium (420‑440 ppm) and moderate lighting.
Bottom line: supplemental feeding works, but consistency beats quantity every time. You’ll see faster colony expansion without the headache.
Is It Safe to Glue Duncan Coral Directly Onto Rock?
Yes, you can glue a Duncan coral directly onto rock, and it’s often the best move.
Use cyanoacrylate-based gel glue—it’s reef-safe and sets underwater.
Just dry the rock slightly, dab glue on the frag plug or the coral’s calcified base, then press it firmly for 15 seconds.
Don’t glue the fleshy polyp, though; that’s a fast track to infection.
A sturdy mount prevents falls, saving you from tearful rescues.
Bottom line: glue away, but keep it on the skeleton.
Rounding Up
You probably bought a Duncan for its looks, and yeah, that’s fair. But its real charm is how forgiving it is. Stable calcium (around 420 ppm) and moderate flow—you’re set. It won’t judge your clumsy hands or forgetful feeding schedule. One colony can outlast your starter tank. Don’t overthink it. Keep params steady, give it rock to grip, and it’ll reward you with tentacles that wave like it’s happy to see you. Bottom line: buy one, glue it down, and stop worrying.